


Which FastPipe will make your compressor sing—and your shop a little jealous?
Your compressor is only as good as your piping. Bad runs steal pressure and slow work. I hate slow tools.
I tested nine RapidAir FastPipe pieces so you don’t have to. Read on for FAST installs, CLEAN air, and setups that actually make sense (and maybe one that makes you smile).
Top Picks


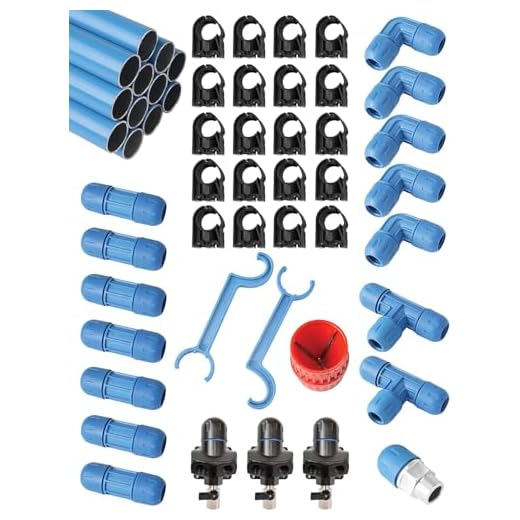


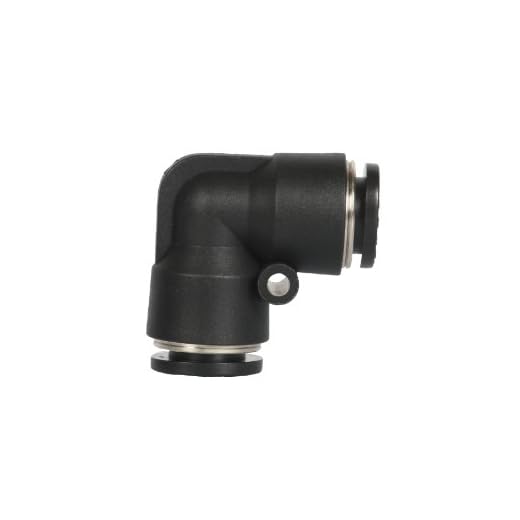


1-inch FastPipe 235-ft Master Kit
A comprehensive kit built for heavy-duty use and long, straight runs. Installation is fast compared with traditional piping methods, and the aluminum construction helps keep air clean and corrosion-free.
Overview
I view this 1-inch, 235-foot Master Kit as a top-tier option if you're building a large workshop or connecting multiple heavy air tools. The system is designed for fast, professional-looking runs and offers the durability of aluminum with compression-style fittings that eliminate glue, soldering, or threading.
Key features and what they mean in practice
I like that the kit is aimed at replacing slow, labor-intensive methods; in my experience it shaves a lot of installer time while delivering a neat, low-maintenance system. A user quote I often think about: "We ran 250 ft throughout our facility at a cost $22,000 below vendor quotes." That captures the real-world savings potential.
Benefits, limitations, and practical tips
Practical tips: pre-plan your outlet locations and ceiling/wall mounts to minimize cutting and unions. If you're converting from threaded steel or PVC, expect major time savings — but budget a couple of hours to learn the compression-fitting technique if it’s new to you.
3/4-inch FastPipe 240-ft Master Kit
A larger 240-foot kit that gives you long uninterrupted runs and multiple outlets with a clean, professional look. It’s ideal if you want to supply several workstations without frequent unions or splices.
Overview
The 3/4" 240-foot Master Kit is what I recommend when you need longer continuous runs but prefer the 3/4" capacity. It’s especially handy in shops where multiple air users are spread along a single spine and you want to minimize joints.
Notable features
I appreciate that this kit includes a large number of clips and fittings so you can finish an installation without chasing parts. In practice, that means fewer trips to the hardware store and a cleaner final routing. For shops that want fewer pressure losses across long runs, the straight sections here are a big plus.
Benefits, limitations, and installation tips
Tip: lay out your run on the floor first to visualize outlet spacing and clip locations. That small upfront step cuts down on cuts and unions during assembly.
1-inch FastPipe 90-ft Master Kit
A compact 1" kit that gives you professional capacity in a shorter footprint — great for smaller industrial bays or multi-bay garages. It balances airflow capacity with a manageable kit size and quick installability.
Overview
This 1" 90-foot Master Kit is a good fit when you want the higher flow capacity of 1" piping without committing to the largest master kit. It’s a popular choice for pros who need reliable supply to a compact shop area.
Key feature set
I like this kit because it gives many of the benefits of the full-size master kit but in a package that’s easier to handle and stage. Installers often comment that assembly is "foolproof and fast," and the finished routing looks professional and clean — important if the job is customer-facing.
Practical advice and caveats
If you plan to run multiple grinders, sanders, or impact tools, this 1" kit is a sensible step up from 3/4" and a lot easier to install than traditional threaded systems.
3/4-inch FastPipe 90-ft Master Kit
A practical, budget-friendly kit that covers most small-to-medium garage and shop needs. It balances a compact footprint with the same fast-install advantages of larger FastPipe systems.
Overview
This 3/4-inch, 90-foot Master Kit is the kit I reach for when a full industrial run isn’t required but I still want professional performance. It’s an economical way to get ceiling or wall-mounted compressed air distribution without the mess and labor of threaded or soldered systems.
What comes in the box and why it matters
Because the kit includes common fittings and a tool set, most hobbyists can complete an effective installation in a weekend. One reviewer said the kit "provided plenty of tubing and fittings" for a 30'x40' shop — that lines up with my expectation that this size hits the sweet spot for serious garage use.
Benefits, limitations, and practical advice
If you’re putting air into a single bay or a two-bay garage, this kit is an excellent balance of price, convenience, and lasting performance.
1/2-inch Equal Tee Push-to-Connect Fitting
A dependable nylon tee that makes splitting a main supply line simple and secure. It’s a must for creating branch feeds to tools or secondary lines without specialized tools.
Overview
The equal tee fitting is the component I use when I need to split a line — for example to feed two adjacent workstations from a single trunk. It’s simple, effective, and integrates cleanly with RapidAir tubing.
Features that matter
In practice, the tee makes routing tidy; one user noted they used it to split a main line "to two separate locations" and found it "worked like a charm." I’ve found that paying a bit more for OEM fittings avoids headaches later from off-brand wear or leaks.
Installation tips and caveats
Overall, it’s a small investment that dramatically simplifies multi-drop layouts in a compressed-air network.
1/2-inch Elbow Push-to-Connect Fitting
A simple elbow that handles direction changes cleanly and saves space compared with bending tubing. It’s reliable and easy to install where a neat right-angle is required.
Overview
I rely on these elbows when routing around rafters, studs, or other obstacles. They provide tidy 90-degree turns without stress on the tubing and make it easy to achieve a professional-looking layout.
Key attributes
A frequent comment from users is that installation feels almost too easy — yet performance is solid and leak-free. Be aware that one user mentioned screw hole sizes differ from older RapidAir components; if you’re retrofitting into an existing layout, double-check mounting screw sizes.
Tips and practical considerations
This is one of those small parts that keeps an installation clean and functional; I usually buy a handful extra to have on standby during a build.
3/8-inch Push-to-Connect NPT Adapter
A small but reliable brass adapter that makes connecting 1/2" OD tubing to 3/8" NPT devices painless. It’s a useful component for customizing outlet hookups or adding localized plumbing.
Overview
This 3/8" NPT adapter is one of those small parts that I’ve found indispensable when detailing an air distribution system. It lets you connect push-fit tubing to threaded valves, couplers, or accessories without thread sealant or special tools.
What's important about this piece
Customers frequently say this is a "quick and easy" way to run more outlets, especially in barns or workshops where off-brand connectors have failed. I also advise buying a couple of extras; thermal cycling can cause tubing to shift, and a spare connector prevents a needless shutdown to fetch replacements.
Practical tips
Overall, it’s a low-cost, high-utility component I recommend keeping in your parts drawer when installing or expanding a RapidAir system.
1/2-inch Push-to-Connect NPT Adapter
A compact, practical adapter that simplifies tying push-fit tubing into threaded systems. It’s very handy for connecting accessories or matching different thread standards without tools or sealants.
Overview
I keep a few of these 1/2" push-to-connect-to-NPT adapters in my parts bin because they make bridging between push-fit tubing and threaded ports trivial. You cut, push, and you’re done — no soldering, threading tape, or expensive adapters required.
Key details that matter
A common issue some users reported is mislabeling across sellers, so verify size before you install. When correctly matched, these adapters are fast and reliable — one reviewer said, "Easy to install. Glad I went with these." Small parts like this are often the difference between a tidy installation and one full of jury-rigged connections.
Use cases and cautions
I recommend keeping extras on-hand; they’re inexpensive and save time when you run into a mismatch during assembly.
3/4-inch FastPipe End Cap (F1006)
A simple end cap that provides a neat, reliable closure for unused runs. It’s an inexpensive way to finish a run and prevent contaminants from entering the line during construction or downtime.
Overview
When I finish a run or temporarily winterize a line, I reach for an end cap like this one. It’s a small, no-nonsense component that prevents dust, moisture, and stray particles from entering an open pipe.
What to expect
End caps are one of those overlooked parts that make a finished installation look intentional and last longer. One practical use-case: cap off a branch while planning future expansions — the cap keeps the line clean until you add a tee or outlet.
Practical notes
This part won’t change the performance of a system, but it prevents small issues later and is inexpensive insurance for a tidy, durable pipeline.
Final Thoughts
My top pick is the 1-inch FastPipe 235-ft Master Kit (9.6 out of 10). It’s the best choice for large shop installations that run heavy tools. Strengths: massive flow capacity, long straight runs with fewer unions, and aluminum construction that helps keep air clean and corrosion-free. Buy this if you run multiple heavy pneumatic tools or want a future-proof backbone for a large bay.
Runner-up: the 3/4-inch FastPipe 240-ft Master Kit (9.2 out of 10). Strengths: the longest continuous run and a clean, professional look for multiple workstations. Choose this if your priority is long, uninterrupted runs feeding several stations where high-volume burst flow is less frequent than steady multi-outlet distribution.







Seriously, those push-to-connect adapters (3/8″ and 1/2″ NPT) can be a leaky headache if not installed right. I bought a couple and had to redo them with a little PTFE tape and finger-tight seating — the first go they weeped.
Not saying they’re bad — just: hand-tight + quarter turn isn’t always enough imo. Be prepared to test and re-seat.
I had a fitting leak and it turned into a mini fountain in the garage. 😂 Now I do the soap-bubble test on every connection before I call it a day.
Thanks for the heads-up, Emily. We mention checking for leaks post-install in the article, but your PTFE tip is useful — others have reported improved seals that way.
Make sure the tubing is deburred/cut cleanly. Even a slight burr can prevent the O-ring from seating properly and cause leaks.
Interesting — I thought push-fit was supposed to be tool-free. Will try tape next time. Did you have to cut the tubing squarely or was a quick slice good enough?
Picked up the RAPIDAIR FASTPIPE F28090 1″ 90′ kit for a smaller bay and it’s been solid. Compact but still plenty of flow for my dual-impact setup. Installation was quick and I liked the blue tubing — helps me spot the air line among the spaghetti of other hoses.
Glad it’s working out, Marcus. The color-coding is one reason many pros like the FastPipe kits for multi-service shops.
Nice — I almost went with the 90′ for a side bay but ended up with the 235′. For a single bay though, the 90′ looks ideal and less overkill.
Ok — I’m deep into the hobby-shop debate and this roundup helped but I still need advice.
I have a one-car garage converted workshop (bench tools + small sandblaster + airbrush setup once in a while). I’m leaning toward the RAPIDAIR F28070 3/4″ 90′ kit (best for hobby shops), but I also want the option to add a small paint gun later.
Thoughts? Is 3/4″ enough for occasional spray work? Also, should I buy the end cap F1006 separately if I plan to leave a short unused run?
TIA for any real-world tips — pics might be posted if I pull the trigger! 😊
I run a 3/4″ main in a similar setup and a small receiver for the spray gun worked great. If you plan on full-time paint work later, upgrade to 1″ later.
For a one-car garage with occasional spraying, the 3/4″ 90′ kit should be fine, especially if you add a local 5-10 gallon receiver/regulator for spray work. Yes, grab the end cap (F1006) if you have an unused stub — cheap insurance against contamination.
Also consider the Rapidair 50200 equal tee if you want to split to a corner bench without losing much flow — saved me a bunch of rerouting.
If you’re doing airbrushing too, get a clean inline filter and spare adapters. Airbrushes hate oil/mist.
If you keep runs short and minimize sharp bends (use the 50300 elbow for tight corners), 3/4″ will punch above its weight for hobby use.
Nice list. The 3/4″ 240 FT Master Kit seems perfect for long continuous runs like the review says. My only worry is pressure drop if you try to run high-CFM tools at the far end.
Does anyone recommend adding an inline regulator or a small localized receiver at the far workstation?
Good question, Tom. Adding a small local receiver or a regulator with a moisture trap at the end station is a smart way to mitigate pressure sag for intermittent high-CFM tools.
Yep — I added a 10-gallon receiver and gauge/regulator at my far bench and it smoothed out the pressure. Also helps for finishing tools (spray guns) so you don’t get pressure spikes.
FastPipe? More like “Fast to buy, slow to convince my partner we needed another ‘pipe’ in the garage” 😂
But seriously, the name sounds cool and the kits do seem cleverly engineered. I might grab a couple of the adapters and the end cap to tidy up my DIY project. Also — who else hates reading tiny fitting sizes? 3/4″ vs 1″ makes me squint every time.
Pro tip: if in doubt, take a picture of the tool inlet and compare in the Amazon listing before buying. Saved me once from a returns hassle.
Same! I taped a small size-chart to the wall near my tool station. Saves me from ordering the wrong elbow when I’m half-asleep.
Haha — we hear you, Karen. Fitting sizes are a squint-fest. The article includes a quick cheat-sheet of which size suits common tool types to help pick without the spreadsheet.
Great roundup — I actually installed the RapidAir 1in. FastPipe Master Kit (the 235-ft) in my shop last year and it was a game changer.
Pros: super fast install, aluminum keeps things noticeably cleaner than my old black pipe, and the multiple outlets made routing to each bay painless.
Cons: you’ll want decent hangers if you run long straight runs — the weight adds up. Also, my compressor needed a little extra tune-up to keep steady pressure across all outlets. 😅
If anyone’s on the fence about the 1″ vs 3/4″, ask about your longest tool run before buying.
Thanks for sharing, Sarah — really helpful to hear from someone who’s done the full install. For others reading: Sarah’s point on hangers is spot on. We recommended spacing and hanger types in the installation section of the article.
Totally agree — I used steel strap hangers every 6-8 ft on my 120 ft run. Saved me from sagging after a few months.
Quick question — what compressor size were you running to keep pressure stable with all outlets? I’m thinking of the same kit but not sure my 60-gallon will cut it.
Quick technical note: the Rapidair equal tee (50200) and elbow (50300) play nicely with the 1/2″ tubing, but if you’re mixing 3/4″ or 1″ mains you’ll want to plan transitions carefully. A poorly planned reduction can starve a branch.
I map flow and worst-case simultaneous tool use before finalizing fittings — helps avoid surprises during first startup.
Great tip, David. We included a basic flow planning checklist in the article — mapping worst-case load is key for multi-bay setups.
Mapping saved me from oversizing my smaller branches. I labeled every outlet by expected max CFM.
Does anyone use the 3/8″-NPT adapter to hook up pneumatic air tools directly? I’m thinking impact wrench to quick-disconnect — but worried about restrictions and heat.
Also, are these brass adapters robust enough for heavy shop use?
They work fine for light to moderate tool use. For heavy continuous duty (like production-level impacts), you might want a heavier-duty threaded fitting or larger ID to avoid pressure drop and wear.
I’ve used the 3/8″ adapter for hand tools and it’s been fine. For full-time use, step up the gauge and check for heating — brass handles that ok but the tubing side can become the limiting factor.