


Which quill will make your Bridgeport purr — and which ones just rattle? A hands-on shortlist for every shop.
Stop guessing your depth. I’ve spent more than a few afternoons nudging the quill and squinting at worn marks. Simple upgrades often save me time and frustration.
A new stop, handle, or a DRO can make a tired mill feel precise again. I kept the list practical — real parts you can fit in a weekend and use the next day.
Top Picks




iGaging Digital DRO and Quill Kit
The iGaging DRO and quill kit upgrades hand-operated quill control into a readable, repeatable system. It’s not laboratory-grade, but it’s robust, reasonably accurate, and excellent value for most shop tasks.
Overview
I recommend this iGaging DRO quill kit when you want a measurable improvement in setup speed and repeatability without spending a lot. The scale and readout make it much easier to set depths and tram the quill compared with eyeballing or relying on mechanical stops.
Features and install considerations
The kit provides a 6" travel scale with 0.0005" resolution, stainless steel beam, and mounting brackets. It runs on a single CR2032 battery which gives long life in typical use, and the readout supports inches, millimeters, and fractions.
Real-world performance and tips
In my shop I found the iGaging unit fast to install and very usable day-to-day. Expect to do some fitting and possibly swap a couple of screws for metric sizes — some users reported bent brackets from shipping and needed to straighten them before final mounting. It won’t turn a knee mill into a micro-inch machine, but it will make depth control and repeatable cuts far easier.
My take
This is one of the best value DRO/quill upgrades for hobbyists and small shops. It’s not as precise as premium systems, but the functionality it adds is dramatic for the price.
HHIP Quill Stop 1/2-20 Rod
This quill stop offers dependable rapid depth setting and positive clamping for Bridgeport-style mills. It’s inexpensive, well-made, and saves time for repetitive drilling or boring tasks.
Overview
I rely on a robust quill stop like this when I need repeatable depth control. The HHIP 3900-0200 is a straightforward, time-saving device: clip it on the quill or thread it onto the stop rod and you’ve got a mechanical stop that’s faster than clutching the quill each time.
Features and fit
This model is designed for Bridgeport and other mills that use a 1/2"-20 stop rod. It’s compact, positively clamping, and intended for rapid depth setting during drilling or countersinking operations.
Practical use and tips
In my experience it vastly speeds repeated operations. For example, when drilling multiple identical holes in a fixture, the quill stop keeps each hole consistent without constantly checking with a depth micrometer. Several users in the field call this a part worth having spare because it’s cheap and effective.
My take
If your mill uses the standard stop rod size, this is a small upgrade that pays for itself in time saved. It won’t replace precision depth measurement, but for shop work it’s one of the most useful inexpensive accessories you can add.
HHIP Quill Feed Handle 1" Hub
This handle offers a comfortable grip, a 1" hub, and a spring-loaded pin for engaging quill speeds, making it a robust upgrade for many mills. Some units may need the hub bored out slightly for a perfect fit.
Overview
I’ve used the HHIP 3900-0201 quill handle and appreciate its combination of comfort and functionality. The 1" hub gives a solid mounting area and the spring-loaded pin makes it easy to flick into high-speed quill engagement.
Features and user experience
Key attributes include a spring-loaded engagement pin and an indexed action that retracts the index plate pin with a quick wrist movement. Many users report it fits Bridgeports well after minimal reaming or boring to the correct diameter.
Installation tips and notes
A number of buyers commented that the hole sometimes needs light boring to fit perfectly; I recommend checking fit on a lathe or boring head if possible. Also, use a small amount of thread locker on top screws to prevent loosening in shop vibration. Once fitted, the handle feels positive and makes quill control more pleasant.
My take
This is a practical, well-thought-out replacement handle that improves usability. If you’re comfortable with a small amount of fitting it’s a great upgrade that will last and feel better than many generic handles.
JN400S Y-Axis Power Feed 90W
This Y-axis power feed adds consistent, hands-free table movement to small Bridgeport-style mills. It’s a solid value for the performance, though some minor install tweaks and attention to stops are required.
Overview
I installed a unit like the JN400S to take the tedium out of long table feeds on my older knee mill. A power feed gives consistent motion, frees your hands, and improves surface finish on long cuts. This model gives a useful speed range and a beefy torque rating for milling tasks.
Key specs and install notes
It offers a 90W motor, 0–200 RPM range, and a claimed 650 in-lb torque. The unit is designed to bolt to many Bridgeport-style and knee mills, but the final fit depends on your machine’s table and screw configuration.
Real-world performance and caveats
In use the feed is smooth and reliable; I found it a big help for repetitive long passes. A few users mention the need to reconcile shim stacks and possibly alter stop mounting positions during installation. Also, the knurled dial nut is plastic on some units — I replaced mine with a metal nut to avoid wear.
My take
If you want hands-free table motion without a high-cost retrofit, this is a practical choice. Expect to spend an hour or two on fitting and to add or modify stops for reliable limit control.
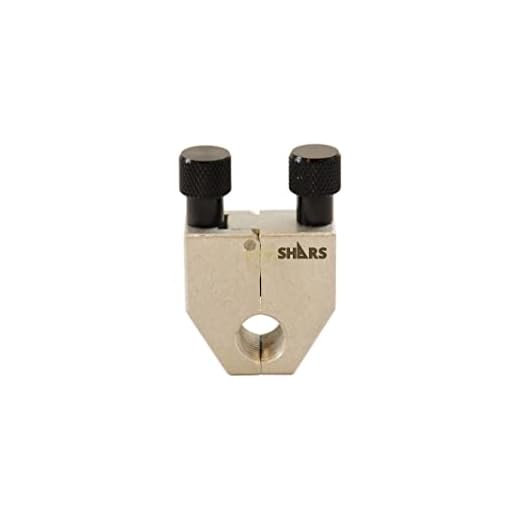
Shars Quick Quill Stop 202-9530
This quick quill stop is a compact, durable accessory that makes depth control faster and more repeatable. It clips on easily and stays put under normal drilling forces.
Overview
I consider a quick quill stop like this essential for day-to-day manual machining. It gives rapid, repeatable depth stops and is small enough to keep in the toolbox. For drilling operations that require multiple identical depths, this saves a lot of time.
Design and compatibility
This Shars unit clips onto the quill and is intended for mills that use a 1/2"-20 thread rod. It’s simple: a clip, positive clamping, and no complex adjustment mechanisms.
Usage tips and limitations
I’ve used this for repetitive hole patterns and counterboring operations. It’s terrific for production-style manual work where you need the operator to repeat the same depth quickly. Note that it won’t fit metric stop rods and its simple clamp doesn’t replace a micrometer-style stop for ultra-precise work.
My take
For manual machinists who do repeated drilling or need an inexpensive depth stop, this is a practical purchase. It’s reliable, well-reviewed, and one of those small shop upgrades you’ll use constantly.
Quill Feed Handle Screw Bracket Set
This three-piece set gives you a handle, bracket, and a larger screw — a practical solution when a mill needs multiple small replacements. Fitment can be straightforward on standard Bridgeport-style machines.
Overview
I like this multi-piece set for situations where a mill needs more than a single replacement part. The handle, bracket, and screw cover the typical wear points of a feed handle assembly, which means fewer trips to the hardware store.
Components and dimensions
The set lists the same handle dimensions as common feed handles — 64mm outside diameter, 26mm inner hole, 250mm length — and includes a larger screw for secure mounting.
Usage and fit notes
In day-to-day use the handle is comfortable and gives good leverage for quill operation. If your machine has vintage wear or nonstandard bushings you might need to ream or fit the inner diameter slightly. Overall it’s a practical compromise between price and functionality.
My take
If you need a few small replacements at once, this set is a convenient, wallet-friendly option. It’s not high-end but it restores function quickly and cleanly.
Quill Feed Handle Bracket Pack
I found this bracket and handle set to be a cost-effective way to replace worn quill hardware on Bridgeport-style mills. It’s basic, functional, and built from decent materials for the price.
Overview
I like this handle-and-bracket set when I need a low-cost replacement quickly. It gives you the two parts you most commonly need to restore a worn quill feed assembly without spending much. The materials feel sturdy enough for routine machine-shop use, though it’s not an OEM-grade, precision part.
Key features and who it's for
This is aimed at hobbyists and small shops that want to keep a mill working without downtime.
Practical benefits and limitations
In practice I used a part like this to replace a stripped handle on an older clone bridgeport. It restored positive control over the quill and saved me from fabricating a new bracket. Expect to do minor fitting on machines with nonstandard bushings or older wear patterns. If you need exact OEM tolerances or a stainless upgrade, this isn’t the part to reach for.
My take
I recommend this if you want a quick, inexpensive repair. It’s not a precision spare but it works, and the price makes it easy to keep a spare on the shelf.
Quill Lock Bolt Handle Assembly
This quill lock bolt and handle assembly provides a straightforward replacement for stripped or missing quill locks. It’s a basic part that’s inexpensive and easy to install when the thread matches.
Overview
I use quill lock bolt assemblies like this when a machine’s original part is lost or worn. They’re a small and inexpensive way to restore safe locking of the quill. This specific version is offered with a 5/16"-18 thread — confirm your thread before ordering.
What to expect
The part is a handle plus lock bolt assembly, designed to replace factory hardware. It’s not a precision cosmetic piece — it’s functional, and it’s meant to work rather than look pretty.
Practical notes
Installation is typically simple: remove the old bolt and thread in the new unit. If your machine uses a different thread (common on older mills or metric machines), you’ll need the correct size or an adapter. Ergonomically it’s fine for shop use, but the handle shape and finish are plain.
My take
This is a sensible spare-part buy for hobbyists and shops that need to get a mill back into service quickly. Just double-check thread size before purchasing to avoid a return.
R8 Spindle Alignment Screw Set
These alignment screws are a simple, inexpensive solution for spindle setup and alignment tasks. They’re functional parts, but thread size and pitch are critical — check your machine before ordering.
Overview
I keep a set of alignment screws like this in my toolbox for quick spindle checks and minor adjustments. They’re simple parts that can save time during setup, but compatibility is the key point — older machines sometimes use different thread pitches.
What you get
These are basic alignment screws sold as an R6 and R8 package. They’re intended to engage common spindle holes for alignment or stop purposes.
Practical use cases and caveats
I used a similar set to hold a dial indicator mount while tramming a spindle. The screws performed well — but a review noted a 1966 machine used a different thread pitch, so measure your spindle threads before you buy. If you have an older Bridgeport or a nonstandard clone, expect to confirm thread pitch or have a tap on hand.
My take
These are solid little tools when they fit. For modern R8 machines they’re a quick, inexpensive option; for vintage machines double-check thread specs first to avoid returns.
Quill Lock Sleeve 5/16 Thread Set
This quill lock sleeve is a straightforward replacement component for machines that accept 5/16" threads. It’s inexpensive and works fine if you order the correct size, but it’s a single small part so double-check compatibility.
Overview
I consider quill lock sleeves like this one a handy spare to have for quick repairs. They don’t dramatically change machine performance, but if your sleeve is damaged or corroded, replacing it restores secure quill locking.
Fit and function
The product listing emphasizes the 5/16" thread size; the seller asks buyers to note their required size at ordering. Because these are small threaded components, getting the thread and length right is critical to avoid binding or poor clamping.
Practical tips
Measure the existing sleeve and thread pitch on your machine before purchase. I’ve found that an incorrect sleeve length or thread pitch can cause binding or prevent the lock from clamping properly. When matched correctly, it restores normal quill locking without fuss.
My take
Buy this if you need a quick replacement and you know your thread size. It’s a basic part that does what it’s supposed to when the fit is correct.
Final Thoughts
My top pick for most folks is the iGaging Digital DRO and Quill Kit. Strengths: gives you a readable, repeatable quill travel readout, is robust for shop use, and delivers the biggest practical improvement in accuracy and setup speed. Ideal use case: hobbyists or small shops that want measurable repeatability for drilling, boring, tapping, and light production work. Note: it’s not laboratory-grade, but it’s excellent value and sensible to install and calibrate on most Bridgeport-style heads.
If you just want a fast, inexpensive way to stop wasting time on depth settings, grab the HHIP Quill Stop 1/2-20 Rod. Strengths: simple, reliable, positive clamping and extremely inexpensive. Ideal use case: anyone doing repetitive drilling or boring who needs quick, repeatable depths without adding electronics — perfect for production runs and quick setups.






I replaced a stripped quill lock with the ‘Milling Machine Part Quill Lock Bolt Handle Assembly’ — fit was fine but the finish was rough.
Functionally it’s solid though. Would like a slightly longer handle for more leverage.
Anyone else mod the handle length?
I use a rubberized slip-on sleeve for comfort and extra leverage. No welding needed.
I welded a bit of pipe extension on mine. If you weld, smooth the bead so it doesn’t catch your glove.
A longer handle is nice but remember it can hit the control panel if you overdo it. Measure first!
You can add a slip-on longer handle or sleeve for more leverage — a short length of steel tube pressed on works well and is reversible.
Anyone used the quill lock sleeve 5/16 thread? I replaced one and it was fine, but want to make sure others aren’t having thread tolerance issues.
I ordered assuming 5/16 was universal — evidently not always the case. 🤷
5/16 is common but not universal. Best practice: verify thread by measuring or comparing to an existing part before ordering replacements.
I keep a small thread gauge set on the bench for exactly this reason. Saved me from two wrong orders.
I love that the iGaging DRO supports inch/mm/fractions. For layouts where I switch between decimal and fractions, it’s a lifesaver.
Accuracy for 90% of my projects is more than enough.
Agreed. The fraction mode is my go-to for woodworking-style bolt patterns on metal plates — quick and familiar.
That multi-format feature is underrated. It speeds up setup and reduces conversion mistakes.
Don’t forget to lock the units when you’re in production runs — accidental units changes are surprisingly common.
Great roundup — I actually installed the iGaging DRO and quill kit on my old mill last year.
It definitely makes repeat cuts way less painful. My only gripe: the scale sometimes needs a gentle re-zero after heavy taps.
Anyone else notice drift after a few months?
I had drift too until I realized the battery contacts were a bit loose. Replaced the battery cap and it’s been stable.
Glad it helped, Ethan. Some light maintenance helps — clean the scale rails periodically and make sure the mounting isn’t flexing. That usually fixes small drifts.
Yup, same here. I gave mine a small shim at the bracket and tightened the cable routing away from vibrating parts — reduced the re-zeroing a lot.
I installed the RATTMMOTOR on the Y-axis and paired it with a DRO — life changing for long slotting passes.
A few install notes from my trial-and-error: 1) watch the belt tension, 2) program a slow start to avoid chatter, 3) clamp everything before final cuts.
Also, the motor mounting holes didn’t line up perfectly on my mill, so I had to make a custom adapter plate.
If you’re comfortable with a little metalwork, it’s worth the upgrade. If not, budget a machine shop visit for the adapter.
Great practical steps, Samuel. The adapter plate is a common mod — making it removable keeps the mill flexible for other tasks.
If you share the dims, I’d love them too. Saving for a future project!
Do you have a photo of your adapter plate? I’m thinking of doing the same but not sure how to start.
I’ll post a pic later this week — it’s nothing fancy, just a 3/8″ plate with slotted holes. Happy to share dims.
That slow start tip is golden. I ruined a cutter on a sudden engagement once — learned the hard way.
Shars Quick quill stop is basically magic if you hate measuring each hole.
Installed in 5 minutes and clips on/off like a charm. No regrets.
Also, it survived a barnacle-level bungle where I forgot to tighten the clamp. Still there. 🤦
The Shars piece is a handy little tool. If you find it slipping under heavy loads, check the mating surface for nicks or burrs — a quick stone can help.
Good to know about the quick clip—I bought one last month and it’s saved me a ton of time on small runs.
I’m considering the RATTMMOTOR JN400S Y-axis power feed but worried about noise and stopping accuracy.
Does anyone have real-world experience with consistent stop positions (for example for keyway milling)?
Also curious about electrical hook-up — is 110V plug-and-play for most hobby shops?
The RATTMMOTOR is pretty quiet for a power feed of that torque. For precision stops, install positive mechanical stops on the table — the motor is great for feed consistency but not a substitute for hard limits. 110V wiring is usually straightforward, but check the amp draw and use a dedicated circuit if you’re running other heavy equipment.
It draws more inrush current than idle, so I put it on a breaker that wasn’t shared with my welder. Saves headaches.
Install tip: while aligning the feed, mark the table at extremes before finalizing stop positions — saved me from a misaligned cut.
I installed one last year. Stops are repeatable if you back off the clutch a hair before engaging the motor. Mechanical stops are still the best practice.
Question: those 1Set R8 spindle alignment screws — will they work on a 1940s Bridgeport clone? I don’t want to guess thread pitch and buy the wrong ones.
If you can’t measure, bring the spindle to a shop and have them gauge it. Worth the couple bucks for peace of mind.
Older machines can be a mixed bag. Measure the thread pitch and diameter on your spindle if possible. The product is inexpensive, but thread mismatch is the usual cause of returns.
The economy 3pcs sets like Cnswee6 are tempting when you have an old mill that needs a ‘parts shower’.
I replaced a cracked handle, a stripped screw, and a wobbly bracket with a single set and it got me through a season.
That said, fitment was “ok” — not OEM-perfect. You pay for convenience.
Would recommend for hobbyists or as a stopgap, but if you’re doing production, buy the better HHIP/SHARS parts.
Also, lol at the packaging — arrived in a bag like it was a mystery grab-bag. 😆
Haha packaging was my favorite part too. Felt like a present from a very frugal fairy.
I used the kit as a donor set for one good handle and then recycled the rest. Works well as parts bins.
Totally agree. Those kits are great for getting a machine running, but replace critical wear parts with higher-grade pieces when you can.
If you get a kit, check all screw threads against your machine before final assembly — saves returns.
Same experience. Kept one mill running for a fair bit before upgrading the feed handle to something sturdier.
Nice roundup — bookmarked for when I start upgrading my mill.
Quick question for the crowd: if you were to buy just one starter upgrade from this list for a weekend warrior, what would it be?
I’m torn between the DRO kit and the Shars quick quill stop.
If budget is tight, Shars stop first. But overall, best ROI is DRO.
DRO for me — the time savings across projects is substantial.
I’m in the minority: quill stop first for drilling-heavy stuff. But DRO is the all-rounder.
If you only get one, go DRO. It transforms workflow and reduces mistakes. The quill stop is great too, but the DRO gives more versatility.
I’ve been using the HHIP 3900-0200 quill stop for repetitive drilling in production runs and it’s been a time saver.
Installation was a little fiddly because my mill’s quill had some paint build-up, but once mounted it’s rock solid.
Pros: fast depth setup, positive clamping, cheap replacement if you lose one.
Cons: not super glamorous, but then again it’s a stop, not a Cadillac.
Anyone have tips for marking the stop for quick recall of common depths?
If your quill stop has a flat area, small adhesive labels work surprisingly well until they get oily.
I make a cheat sheet taped to the headstock. Old-school but my shop is chaotic so it helps.
You can also use little colored zip-ties on a nearby lug for visual cues. Cheesy but fast.
Great tip about paint build-up—glad you got it sorted. For markings, I suggest a tiny set-screw with a rubber band index or just a permanent marker and a small engraved aluminum tag for recurring jobs.
I used a drill-engraver to scribe marks into the stop itself. Ugly but effective. 😉
Picked up the HHIP 3900-0201 quill feed handle and a pair of CNxinn10 handles as backups.
HHIP feels nicer — good spring action — but the CNxinn10s are fine for backups.
Heads-up: you might have to bore the hub slightly for a snug fit on older machines, like the author mentioned.
I used a hand file to open the hub just a touch. Quick fix and saved a return trip.
Thanks for confirming the fit note. Small machining on the hub is common — a tapered reamer or a short pass on a lathe usually does the trick.
If you don’t have a lathe, local machine shops will usually do a tiny bore for inexpensive cost.