
I’m Sharing 3 Benchtop DRO Power Feed Favorites — My Picks


Which benchtop DRO power feed will stop me from ruining another endmill? (Spoiler: one of these probably will.)
I hate hand-cranking long passes. I’ve ruined enough finishes and burned enough cutters to know that a good DRO + power feed combo changes the game.
I picked 3 favorites that cover big-shop muscle, compact bench work, cheap upgrades, and a no-nonsense power feed add-on. I’ll tell you what each is best at, what to watch out for, and who should buy what.
Top Picks



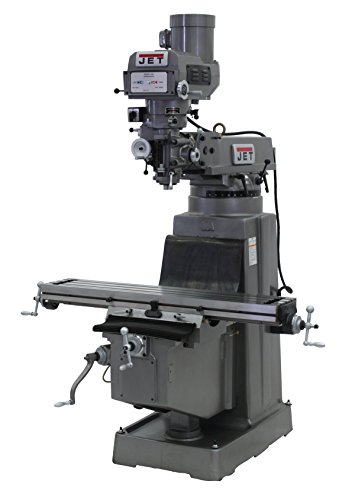
JET JTM-2 Mill with ACU-RITE DRO
This is a heavy-duty benchtop mill built for long-term workshop use and production-level precision. It combines robust mechanical design with a trusted ACU-RITE 203 DRO and integrated X/Y powerfeeds to streamline accurate machining.
Overview
I look at this mill as a shop-level workhorse — it’s built like the commercial machines that last for decades. The combination of certified Meehanite castings, heavy-duty spindle bearings, and the ACU-RITE 203 DRO gives you a platform that feels stable, accurate, and ready for heavy-duty benchtop and small production tasks.
Key features and what they mean to me
I appreciate the internally cooled head for extended workloads — it reduces thermal drift and helps maintain accuracy in longer runs. That said, the machine’s size and 2,200 lb shipping footprint mean you need adequate space and a reinforced floor or dedicated bench.
Practical notes, limitations, and usage tips
Overall, I’d recommend this machine to anyone who needs a rugged, DRO-equipped benchtop mill and can accommodate its size and cost. It’s a long-term tool rather than an impulse buy, and it rewards proper setup and workshop planning.
1300W Benchtop Mill with DRO & Powerfeed
This machine packs a lot of useful features for the price: a 1300W motor, integrated DRO with advanced grating scales, and an X-axis powerfeed. It’s a capable hobby/prototype mill that balances precision and power, though the stand could be stiffer.
What stands out to me
The machine’s three-axis grating scales are the headline feature — they enable precise digital control and useful functions like zero clearance, presets, and power-failure recall. Combined with a 1300W motor and an included X-axis powerfeed, the setup is well suited for precise hobby work, small-production runs, and accurate prototyping.
Features and workflow benefits
I liked the feel of the machine during light-to-moderate cuts — the motor has enough torque for typical steel and aluminum work at benchtop scale. The included powerfeed is a real convenience for repetitive passes and surfacing operations.
Limitations and real-world advice
In short, I recommend this mill if you want a feature-packed benchtop machine with a modern DRO and built-in powerfeed, provided you address base rigidity and take time for careful setup.
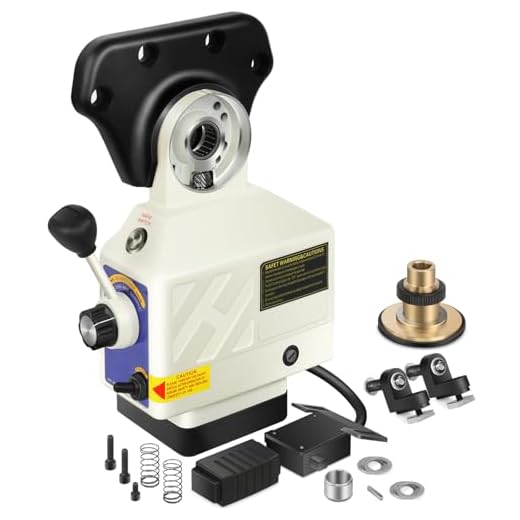
450 in-lbs X-Axis Power Feed Unit
This unit gives hobby machinists a straightforward, affordable way to add automatic X-axis feeding to a knee or benchtop mill. It balances compact portability with a useful torque rating for light-to-moderate milling tasks.
Why I’d consider this power feed
I like this unit when I want a simple, low-cost way to automate an X-axis on a hobby knee mill. It’s designed to be portable and easy to install, so you can add it temporarily to different machines or remove it when not needed.
What it offers in practice
I’ve found these types of units are ideal for repetitive slotting, light surfacing, and small-part production where manual cranking becomes tedious. You still need to check compatibility: the feed expects a 5/8" shaft and the installation method common to many Bridgeport-style mills.
Practical tips and limitations
Overall, this power feed is a solid value pick for hobbyists and small shops that want the convenience of automatic X-axis feeding without a big investment.
0-200mm Remote LCD DRO Kit
This compact DRO kit is a very affordable way to add basic digital readout functionality to lathes and small mills. It gives decent accuracy for the price but comes with a limited range and basic build quality.
Who this is for
I see this DRO kit as a low-cost upgrade for hobbyists or workshop owners who want digital readout capability on a budget. It’s best suited for small travel applications and for machines where 200 mm of travel covers most operations.
What it delivers and how it performs
I’ve found these kits do what they advertise: they convert a manual scale into a readable digital display quickly. Be realistic about expectations — it’s not a shop-grade glass scale system, but it’s very practical for simple milling and turning tasks.
Practical tips and limitations
In summary, I recommend this DRO if you want an inexpensive, functional readout for small machines and are comfortable trading range and finish-quality for price.
Final Thoughts
If you want one, go big and reliable: the JET JTM-2 Mill with ACU-RITE DRO is my top pick for anyone running a serious benchtop shop or doing repetitive production work. Its robust build, ACU-RITE 203 DRO, and integrated X/Y powerfeeds make it the best full-size option — ideal for precision, heavy cuts, and long production runs.
If you’re a hobbyist or need something that saves space but still feels capable, pick the 1300W Benchtop Mill with DRO & Powerfeed. It’s compact, punchy, and gives the best balance of price, power, and integrated DRO features for small shops and prototype work.
Want to add powerfeed to an existing mill without buying a whole machine? The 450 in-lbs X-Axis Power Feed Unit is a solid, budget-friendly pick. Use the 0-200mm Remote LCD DRO Kit only as a VERY cheap stopgap for small machines or lathes — it’s fine for basic layout work but not for heavy-precision use.
Practical Guide: Choosing, Installing, and Getting the Most from a Benchtop DRO + Power Feed
I always start with two quick questions: what am I cutting, and how often will I do it? Those answers drive whether you buy the heavy-duty integrated option (JET JTM-2), a compact all-in-one (1300W mill), a bolt-on powerfeed (450 in-lbs), or a budget DRO kit (0–200mm).
Match features to real shop needs
Installation tips I’ve learned the hard way
Operation and settings I actually use
Quick comparison
| Product | Best for | Why I’d pick it |
|---|---|---|
| JET JTM-2 Mill with ACU-RITE DRO | Production & heavy bench work | Robust build, integrated DRO, reliable powerfeeds |
| 1300W Benchtop Mill with DRO & Powerfeed | Hobbyists & small shops | Compact, decent motor, built-in DRO, good value |
| 450 in-lbs X-Axis Power Feed | Adding feed to existing mills | Affordable, straightforward, portable |
| 0–200mm Remote LCD DRO Kit | Very cheap DRO upgrades | Low cost, basic readout for light tasks |
Final practical checklist before buying
I’ve found that a little planning and a realistic match between tool and work pays off big: fewer broken cutters, better finishes, and less spoiling of setups. Pick the tool that fixes your biggest recurring pain — that’s the one you’ll use the most.
FAQ
Probably, but check the mounting pattern and table size first. The JET is an integrated package so fit isn’t an issue. The 450 in-lbs feed is a universal-style unit for many knee and benchtop mills, but you’ll need to confirm spindle-to-table clearance and the feed’s mounting bracket compatibility. For DROs, check scale length and whether you need magnetic vs. glass scales.
Integrated systems like the JET or the 1300W mill arrive mostly ready to go. The 450 in-lbs feed is a mid-difficulty install — you’ll bolt on a drive bracket, align the worm, and wire power. The 0-200mm DRO kit is the simplest mechanically but can be fiddly electrically and in routing the scale. I recommend a weekend, basic tools, a digital multimeter, and patience.
Not entirely. A DRO gives precise position feedback and speeds setups, but I still use dial indicators for tramming heads, checking backlash, and verifying fixture squareness. DROs are excellent for repeatability and numeric control of cuts, but mechanical checks remain important.
Match torque to the work: the 450 in-lbs unit is fine for light-to-moderate cuts in aluminum and mild steel. For heavy cuts or production work pick a higher torque, like what’s built into heavier full-size mills (e.g., the JET). For speeds, adjust feed rate to cutter size and material — slower for cutters under load and harder materials, faster for light finishing passes.
Keep scales clean and protected, lubricate the powerfeed geartrain per the manufacturer’s schedule, and check electrical connections regularly. For the DRO, avoid coolant splash and wipe scales with a lint-free cloth. For mechanical feeds, watch for backlash growth and replace worn worm/gear parts when you see play.






Question for anyone who’s fitted the Power Feed X-Axis to a Bridgeport: did you need any adapters for the 5/8″ shaft? I’m looking at the Power Feed unit listed and I’m not super confident about measuring the spindle end correctly. Also — safety wise, is it okay to leave the feed engaged for long runs?
If you post a photo of your spindle end someone here can probably help identify if it needs an adapter. I had to re-bore a sleeve once, awkward but doable.
I used a short sleeve adapter on mine to match the keyway. Took 30 min on the lathe to get a snug fit. As admin said, don’t run unattended for heavy passes.
Thanks all — I’ll take photos tonight and post them. Appreciate the tips!
Most Bridgeport-style mills accept the 5/8″ shaft but some older machines have worn or nonstandard ends. Measure the diameter and keyway carefully. For long runs, make sure lubrication and cooling are good; also check the mounting set screws periodically. Don’t leave it engaged unattended if cutting into heavy material — watch for chatter and motor overheating.
If you want, upload the dimensions and a pic and I’ll give a quick compatibility check — happy to help.
I’m all about budget upgrades, so the 450 in-lb power feed is tempting. Bought one last month and it works surprisingly well for 1/2″ cutters on softer steels.
Not perfect: it struggles a bit on deep roughing passes and the speed control isn’t super smooth at the low end. But for <$200 it's a steal if you don't need industrial torque. Would recommend for hobbyists — just don't expect miracle performance on big cuts 😂
Good practical take, Olivia. We rated it as the best budget option for exactly that reason — great value for light-to-moderate work, but know the limits on torque and speed control.
I had one on an old Bridgeport clone. For light profiling it was awesome. For slotting 0.125″ x 1″ deep? Not so much. Use it within its torque envelope.
Exactly. Also, if you try to muscle it into heavier cuts, be ready for extra wear — learned the hard way lol.
If anyone wants, I can post a short checklist for matching power feed torque to typical cutter sizes/materials — would that be useful?
I installed the 0-200mm DRO kit on a little lathe to save some cash. It works okay for quick setups but don’t expect the precision of the pricier units.
Installation wasn’t plug-and-play on my chuck — had to fabricate some brackets and spend time aligning. The display response is nice, but the scales feel a bit cheap and the travel is limited.
If you need precise shop-quality DROs for production, spend up. If you’re tinkering on weekends, this will do the trick.
Yep — installed the same kit on a small mill. Took longer than the video, and I had to shim the scale because the carriage wasn’t perfectly flat. For the price though, hard to complain.
Thanks for the honest breakdown, Daniel. We noted in the review that the kit is the cheapest way in — but expect to do mounting work and accept limited range/finish.
I bought the cheapest DRO kit as a gag to impress my neighbor (he’s a self-declared ‘precision snob’).
Turns out it actually helped me center some weird parts I was making for a garage project. Neighbor is now quietly jealous. 😂
Lesson: even low-cost DROs can raise your game if you use them right.
Haha love the story. Small upgrades often give outsized returns in day-to-day accuracy. Glad it worked out!
Same happened to me — slapped a cheap DRO on my drill press and suddenly my ‘quick’ setups became respectable. Neighbors notice the difference.
I had the EQCOTWEA for a few months and had a weird electrical hiccup (fuse blew twice). Turned out to be a loose connection in the wiring harness behind the control panel. Fixed it myself but was a pain. 😒
Other than that, it’s a great little machine for prototypes — the grating scale is a nice touch for the price. Just double-check your wiring during setup and maybe have spare fuses on hand.
Good call on spares. Fuses are cheap but hunting them down mid-project is no fun. Also consider a small UPS if you have flaky workshop power.
Vendor had a basic diagram but I ended up tracing it. Re-soldered a dodgy connector and it’s been fine since.
Thanks for the heads-up, Priya. We recommended checking electrical connections during initial setup in the review for exactly that reason. Did the vendor provide a wiring diagram or did you trace it yourself?
Can anyone explain, in practical terms, how much better the ACU-RITE 203 is compared to the cheap 0-200mm kit? I’m thinking in terms of repeatability and real-world tolerances — is it like night and day or more incremental?
I had both on different machines. ACU-RITE held calibration longer and had nicer software features. The cheap one was ok for quick jobs but drifted a bit after knocks and heavy cuts.
If you’re trying to decide, think about the intended use: hobby and occasional parts = cheap kit can be great value; daily production = spend on ACU-RITE (or equivalent).
Short answer: ACU-RITE 203 is significantly more robust in accuracy, repeatability, and features (heavier-duty scales, better backlash handling, and generally a more industrial encoder). In real-world shop terms: with the ACU-RITE you’re reliably hitting tighter tolerances across longer runs and heavy use; the cheap kit is fine for occasional setups and rougher tolerances. So not always ‘night and day’ for a hobbyist, but for production/critical work it’s a clear step up.
Great roundup — I bought a JET JTM-2 last year and it’s been a game changer for my small production runs.
Pros: rock-solid build, ACU-RITE 203 is dead-on for repeat jobs, and the X/Y powerfeeds save so much time on long cuts.
Cons: it’s heavy and took two people to place on my benchtop, and the price is up there — but I think it pays off in reliability.
If anyone’s deciding between a full-size mill or several minis, think about throughput — the JET shrank my cycle times by at least 30%.
Totally agree — moved from a mini to a JET and haven’t looked back. For me it was contouring and threaded holes where the DRO made alignment painless.
Small tip: if you run long feeds regularly, check the backlash compensation in the DRO periodically. Keeps things tight over time.
Thanks for sharing your experience, Maya — that throughput improvement is exactly why we highlighted the JET as our top pick. Do you use the feeds for contouring or mostly for slotting/face milling?
The EQCOTWEA looks sweet for the price. I’m mostly into hobby aluminum parts — will the 1300W motor handle intermittent 1/4″ endmills? Also, anyone found a stiffer stand or upgrade for the one that comes with it?
For 1/4″ endmills in aluminum, the 1300W motor should be fine if you use proper speeds/feeds and don’t try heavy hogging passes. As for the stand, some users have welded a thicker base plate or mounted it to a heavy workbench — that helps a lot.
I’ve used that model for light aluminum work with a 1/4″ carbide and it’s been okay. I bolted the stand to a concrete-filled steel cabinet and it’s much better now.