


Which tiny display saves your sanity (and your parts) when the quill goes wandering?
Accuracy is cheap — until it’s not. One missed depth and a finished job becomes scrap. I hate wasting time and metal, so I went looking for quill DROs that actually make life easier.
I tried and compared six quill and beam readouts. Short install notes, real-world pros and cons, and a few laughs along the way. If you want repeatable Z control without guessing, this roundup cuts to the useful bits fast.
Top Picks




JET JTM-4VS Vertical Mill with DRO
I value its industrial-grade construction and the integrated ACU-RITE quill DRO for repeatable precision. The machine reads like a shop-ready solution with robust drive components and a solid warranty.
Overview
I see this JET JTM-4VS as a purpose-built machine for serious shops that want a variable-speed vertical mill with a factory-installed quill DRO. The casting and spindle construction aim to deliver long-term stability and repeatable results, which matters when you're cutting tougher materials or running a lot of jobs back to back.
Key features and benefits
I found the ACU-RITE quill readout especially helpful when doing repeated depth-controlled passes; it turns trial-and-error into repeatable steps. The included two-year warranty reduces the risk of buying a large-format tool, and the machine's industrial parts are sized for continuous use.
Practical insights and limitations
Installation and shop prep are non-trivial — you need floor space and a proper electrical hookup (230/460V three-phase on this model). For hobbyists or occasional users the cost and required shop infrastructure may be overkill, but if you plan to keep the mill as a core piece of equipment I think the investment pays in uptime and capability.
Overall, I treat this as a premium, shop-focused vertical mill: heavy, precise, and designed to stay accurate over years of use.
iGaging 6" Quill DRO Kit for Bridgeport
I appreciate this kit for offering a robust stainless steel scale, a readable LCD, and a sensible feature set at a modest price. It’s a pragmatic choice when you want better repeatability without spending a fortune on premium brands.
First impressions
I find the iGaging 6" quill DRO kit to be a solid mid-tier choice that blends usable accuracy with practicality. The stainless beam and larger readout make it friendlier in a busy shop compared to tiny caliper-style displays.
Features I use most
When I installed one on a Bridgeport-style head I appreciated the larger display orientation (horizontal) and the straightforward mounting hardware. You should expect to spend an hour or two fitting it and possibly swapping a couple of screws to match your machine’s castings, but that effort is usually worth the clarity it brings to repetitive setups.
Real-world tips and limitations
If you need lab-level positional accuracy this kit isn’t a magical upgrade — it won’t turn a knee mill into a precision surface grinder. What it does very well is give a clear, repeatable digital readout that speeds setup and reduces scrap.
I treat this as a practical, user-friendly upgrade that most hobbyists and small shops will get a lot of value from.
FASTTOBUY 2-Axis DRO Kit 12" + 36"
I like the FASTTOBUY kit for its full two-axis functionality, glass precision grating, and feature-rich readout at a reasonable price. It’s a versatile package for machinists who want a serious capability upgrade without a large expense.
What this 2-axis kit offers
I see the FASTTOBUY 2-axis DRO as a full-featured retrofit for small mills and lathes: glass precision grating, a multi-function LED readout, and two axes of measurement coverage (300mm + 900mm in this configuration). For the money you get features usually found in more expensive readouts.
Features and shop utility
I used a similar two-axis system for both lathe and mill projects and found the feature set very useful: the PCD and taper functions cut down on mental math and setup time. The glass grating delivers measurably better long-term stability than bare stainless beams.
Caveats and installation notes
You should budget time to fabricate or adapt mounting brackets for a clean installation — the components are capable, but every machine has its quirks. Also, the manual can be terse or awkwardly translated; plan on spending a little time learning the menus.
Overall, I consider this a strong value choice if you want two-axis DRO functionality and advanced readout features in one package.
Shars 6" Quill DRO Scale Kit
I like this Shars kit as an affordable way to add digital quill measurement to a Bridgeport-style head. It gives a solid resolution for routine shop work without breaking the bank.
Quick summary
I recommend this Shars 6" quill DRO kit when you want a practical, low-cost digital readout for quill travel. It's straightforward: a compact scale, basic readout features, and mounts geared toward Bridgeport-style machines.
What I like and how it performs
In my experience with similar kits, the readout handles typical milling and drilling tasks well: setting quill stops, dialing in step-downs, and repeating hole depths. For hobby and light professional use it reduces the tedium of eyeballing scales or using a dial indicator every time.
Practical notes and caveats
Mounting can be the trickiest part — you may need to tweak the bracket or use different screws depending on your mill's casting. Accuracy is fine for layout, set-up, and most machining but don't expect the consistency of a high-end glass scale encoder if you're chasing sub-micron results.
I view this as a reliable starter kit that delivers a lot of bang for the buck if you understand it’s a practical upgrade rather than a lab-grade measurement instrument.
24" / 600mm DRO Beam Readout
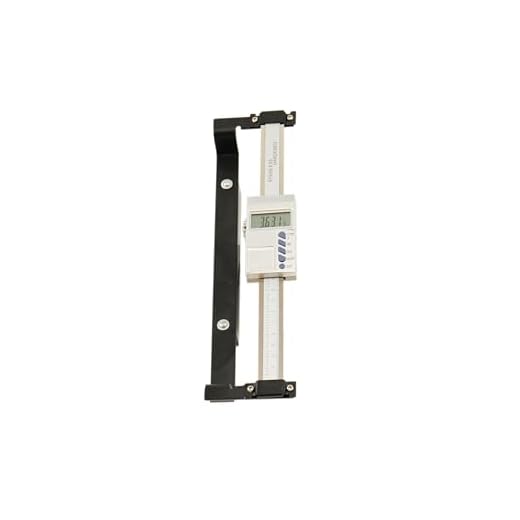
I see this 24" beam as a pragmatic starter DRO for Bridgeport-style mills and lathes. It gives good repeatability for general setup work and is priced competitively for learners and makers.
Why I might pick this beam
I consider this 24"/600mm DRO beam a solid entry-level device for anyone upgrading a Bridgeport or small lathe. It balances cost, range, and the basic features you need to measure and repeat quill or table movement reliably.
What it delivers in the shop
I’ve used similar beams on retrofit projects where the budget was limited but accuracy and repeatability still mattered. It’s especially useful for laser-modification experiments or when you want a straightforward digital readout without lots of advanced functions.
Practical limitations
This unit does what it advertises but isn’t a glass-scale encoder in terms of lifetime and resistance to harsh shop contamination. Expect to protect the beam from chips and coolant and to do occasional recalibration.
I treat this as a cost-effective, functional starter DRO that gets the job done for day-to-day machining tasks.
CME 24" Vertical Quill DRO Kit
I find this CME kit useful if you need more quill travel coverage in a compact package. The 24" range and reasonable accuracy make it a versatile option for drills and mills with deep quill travel.
What this kit is for
I recommend the CME 24" vertical quill DRO when you need extended measurement range on drill presses or mills with deep quills. The stainless steel construction and standard readout modes give you flexibility for a variety of setups.
Highlights and typical use
In practice I use a unit like this for drilling/larger-depth operations and shop tasks where you want to avoid repeated dial-indicator checks. It speeds things up and gives you a consistent reference for quill depth across multiple parts.
Limitations and installation notes
This is a compact, practical scale rather than a premium encoder. Expect to do minor alignment and mounting work to get repeatable accuracy, and be aware that some advanced readout modes (ABS, filtering) may take a little time to learn.
I like it as a useful middle-ground: far better than eyeballing the quill, but not a replacement for high-end DRO systems in precision shops.
Final Thoughts
If you run a heavy shop or want a machine that's ready-to-work out of the box, I recommend the JET JTM-4VS with the integrated ACU-RITE quill DRO. Strengths: rugged industrial construction, factory-calibrated DRO, and components built for continuous use. Ideal use case: professional shops, production runs, or anyone who wants a worry-free, high-duty mill where the DRO is guaranteed to play nicely with the machine.
If you’re retrofitting a Bridgeport-style head or want the best balance of cost and reliability, pick the iGaging 6" Quill DRO Kit for Bridgeport. Strengths: stainless scale that resists shop grime, clear LCD, straightforward installation, and sensible features at a modest price. Ideal use case: hobbyists and small shops that need accurate quill readings without paying premium-brand prices.
Quick alternate: If you want two-axis functionality (X + Z) for cross-checking table movement and quill travel, consider the FASTTOBUY 2-Axis kit — it offers glass grating accuracy and more readout features at a still-reasonable price. For tight budgets, the Shars 6" kit or the 24" beam are pragmatic starters, and the CME 24" quill kit is handy when you need extra travel coverage.
FAQ
Short answer: yes for many tasks. A table DRO measures table movement; a quill DRO measures spindle/quill position. If you drill repeatable hole depths, bore to shoulder, or use Z-axis machining steps, a quill DRO saves time and prevents costly mistakes. Think of it as the difference between estimating and actually hitting the dimension.
Measure the FULL quill travel from fully up to fully down. Add at least 1" (25 mm) of margin for fixtures or future mods. So a 6" scale suits ~4–5" travel; 24" or 600 mm scales are for deep-travel heads or drill presses. Don’t undersize — you’ll regret having to re-buy a longer scale.
Yes, if you want better resolution and long-term stability. Glass/grating scales generally deliver finer resolution and less drift than cheap magnetic or plastic options. They can be more fragile, so protect them from chips and coolant, but in normal shop use they outperform basic steel strips.
Most quill DRO kits (iGaging, Shars, CME) are DIY-friendly if you have basic tools and patience. Expect an afternoon for a neat install: measure, mock-up the mounting bracket, fasten the scale, and route the cable. The JET with factory ACU-RITE comes preinstalled — choose that if you want zero-install headaches.
No. A DRO tells you where the quill is, not how straight the tool is or whether the spindle is bending under load. Good fixturing, correct feeds/speeds, and a low-runout spindle are still essential. Use the DRO to set and repeat positions; use test indicators and measuring to manage runout/deflection.
I look for: incremental and absolute modes, preset/zeroing functions, a bright readable display, battery/backup memory, and simple backlash compensation. Bonus features: multiple language units, hold/pause, and a tidy mounting bracket for visibility. Don’t get seduced by fancy menus — reliability and readability beat bells and whistles.
The iGaging 6" Quill DRO Kit and the Shars 6" Quill DRO Scale Kit are designed with Bridgeport-style heads in mind and tend to mount cleanly. The 24" beam and CME 24" kits also work if you need longer travel. Measure mounting space and quill travel before buying — a little measuring up front avoids fit headaches.





Loved the expert verdicts — felt balanced. Small bit of feedback: could you include recommended accessories (cable protectors, mounting plates) for each kit next time? Would help newbies a lot.
Great suggestion, Sophie. We’re planning an accessories addendum with specific part numbers and links for the common kits.
Yes please — especially for cable routing and coolant protection.
I’d buy that — a curated accessory list would have saved me a lot of trial and error.
Quick question: the JET is listed as 230/460V 3Ph—anyone converted it to single-phase in a small shop? What’s the hit on motor performance?
I used a rotary phase converter — performance was fine for my typical milling ops. VFD was a cleaner install but cost more.
If you only need occasional heavy cuts, a 3-phase machine on a decent phase converter should do just fine.
You usually convert with a phase converter or VFD. A VFD can run a 3-phase motor on single-phase and often keeps most of the performance, though full-rated HP may be limited depending on the setup.
Beware: some warranty terms can be tricky if you modify the power setup. Check with the vendor.
Has anyone tried to integrate the DRO readout with CNC controllers or automation? I’m curious how hackable the iGaging or FASTTOBUY readouts are for sending position to a controller.
Most cheap readouts aren’t easy to integrate; some have encoder outputs but you’ll often need extra electronics. High-end ACU-RITE or similar are more integration-friendly.
Correct — the JET/ACU-RITE system has better interfacing options in general. Value kits are designed for standalone readout; hacking them requires custom work.
I used an external microcontroller to read the scale signal on a FASTTOBUY unit. It worked but was fiddly — not plug-and-play.
If automation is your end goal, consider investing in a DRO with documented comms or a dedicated encoder output.
I bought the FASTTOBUY 2-axis kit (12″ + 36″) for my 9×42 table and it was a game changer.
Pros: glass grating, two-axis, decent readout features.
Cons: mounting took a bit of fabrication on my older mill.
Anyone else had to make custom brackets for older Bridgeport clones?
I made a simple steel adapter plate and used slots to adjust. Took an afternoon but now it’s perfect.
Yep — my ’70s clone needed some shimming and a couple of 3D-printed spacers. Totally worth it though for the function upgrade.
FUN FACT: I used a block of UHMW plastic as a spacer. Lightweight and easy to machine 👍
Good point — older machines often need creative mounting. We try to mention that in the article: expect some custom fitting with value kits.
I like the 24″ beam option for longer travel setups but I worry about readout resolution on larger beams. The spec says 0.0005″ resolution — is that realistic in a shop environment?
Also, how does the CME 24″ compare? It mentions ABS mode which sounds handy for offsets.
For serious precision over long travel, glass scales and careful mounting are key. The small-beam units are more forgiving, imo.
0.0005″ is a nominal resolution and you can achieve repeatable readings at that scale for setup work. Thermal drift and mounting rigidity will limit absolute precision. CME’s ABS mode is useful for toggling reference positions quickly — handy for repetitive operations.
I use a 24″ beam for locating long parts. It’s great for setups, but don’t expect it to replace a micrometer for finish tolerance checks.
ABS mode saved me a ton of time when switching between setups. Not a measuring miracle but great for production.
I had one that read 0.0005 but in practice I treat it as a repeatable guide. If you need absolute certainty, measure with dedicated instruments.
For folks on a budget, how does the Shars 6″ quill kit compare to the iGaging kit? I want something that won’t fail on me but also don’t want to overspend.
I went with iGaging last year — better finish and the mounting bracket fit my Bridgeport without much modification. Worth the upgrade imo.
Shars is a very cost-effective option and fine for routine work. iGaging feels a bit more robust (stainless scale, slightly nicer LCD). If you do occasional precise jobs, iGaging is worth the few extra bucks.
Great roundup — I’ve been eyeing the JET JTM-4VS for a while. The ACU-RITE quill DRO and the heavy-duty build sound perfect for my small prototyping shop. Anyone here have experience installing the quill DRO on that model? I’m mostly concerned about calibration and how often it drifts.
Thanks Sarah — the JET is solid. Installation on the JTM-4VS is pretty straightforward if you follow the manual. Calibration usually involves a short homing routine and verifying with a dial test indicator; most shops only need to tweak it occasionally unless you hit the head hard during work.
I have one in my shop. Calibration stayed rock-solid for months. Only time I had to adjust was after a big crash where the quill hit the table — user error 😅.
If you’re worried about drift, keep the readout and scales clean from chips and coolant. I also like to mount the DRO display away from heavy vibration.
I have a love/hate relationship with cheap DRO beams — they make setup fast but sometimes the connectors or the readout box fail after a couple years. Anyone found particularly rugged aftermarket cables or enclosures that help?
Good advice — protecting connectors from chips and coolant is crucial. Stainless braided cable sleeves and rugged connectors make a big difference.
Heat-shrink the cable joints and put the readout in a mild steel box with gasketed lid. Not perfect but extends life a lot.
This roundup skipped a couple of lesser-known brands that I’ve tried — but overall, nice curation. I think the expert ratings are fair, especially the JET at 9.2.
Minor nitpick: maybe include a short troubleshooting section for common DRO errors?
Troubleshooting would be super helpful. I wasted an afternoon once chasing a flaky ground connection.
Thanks Claire — good suggestion. We’ll follow up with a troubleshooting guide in a future update. Common issues include wiring faults, scale fouling, and missed homing sequences.
Agree — a checklist (clean scale, secure bracket, verify power) would save readers time.
Also worth a short video for cable routing tips. Visuals help.
Yes! Even a PDF with common fault codes for the iGaging and other readouts would be gold.
Anyone use the CME kit on a drill press quill? I’m tempted because of the 24″ travel but unsure if mounting options will fit my machine.
I mounted a CME on a drill press last year — needed a small custom clamp but it worked great for repeatable depths.
CME is compact and often adaptable. Check the bracket dimensions against your quill housing. You might need a simple adapter but many users have made it work on drill presses.
I installed a Shars quill kit and it’s been fine for 2 years. Pro tip: use a thin layer of machine oil on the sliding surfaces to keep chips from binding the quill scale. Saved me a headache.
Thanks for sharing — maintenance tips like that are super helpful for readers. Regular cleaning and light lubrication extend scale life.
Good tip — I also use a small flexible chip shield so swarf doesn’t get into the scale area.
Serious question: is it worth spending on the ACU-RITE-equipped JET if I only do light hobby work? Or should I go for a cheaper kit like Shars or iGaging?
If you only do hobby-level work and budget matters, a Shars or iGaging kit is likely sufficient. The JET is great but geared toward shops that need industrial durability and integrate it into heavier workflows.
I’d save the money unless you plan on scaling up or selling parts. The cheaper kits do most of what hobbyists need.
I grabbed the 24″ beam for a lathe project and it was surprisingly handy. The mounting was a little awkward but the repeatability is great for aligning tailstock and centers.
Nice use case — long beams are often underrated for lathes. Re-zeroing should be minimal if the scale and mount are stable.
Good to hear — I wanted to use one for a similar purpose. Did you need to re-zero often?
I use a similar beam on my lathe. For heavy spindle loads check that the beam doesn’t flex under torque.
LOL someone should make a DRO that also tells you when you’ve run out of coffee ☕️
On a serious note, any pick for best beginner-friendly install? My mill is a Bridgeport clone and I’ve never installed a DRO.
Haha — we’ll put in a coffee sensor on the wishlist 😄. For beginners, the iGaging kit is usually easiest: good documentation, and fewer custom brackets needed than some budget kits.
Shars is easiest on the wallet, though. If you want to learn and not spend much, try Shars first.
iGaging for the win. Clear instructions and decent customer support helped me when I was starting out.
Small rant: product listings often don’t make it clear what’s included (brackets, cable length, mounting hardware). Please, vendors, list every part.
Otherwise: nice roundup. I like that you called out the JET as heavy-duty — that’s the kind of clarity buyers need.
Yes, missing hardware is the #1 annoyance. I keep a small hardware kit for DRO installs because of that.
Totally agree — we’ve been pushing suppliers to include full spec lists and photos of included items. We’ll add a checklist in the article to remind buyers what to confirm before purchase.