


The step-by-step guide to using the Milwaukee M18 Fuel 1/2″ Hammer Drill Kit provides detailed instructions on how to effectively utilize the tool for optimal performance. It assists users in understanding the features and functions of the drill, ensuring efficient and precise operation for various applications.

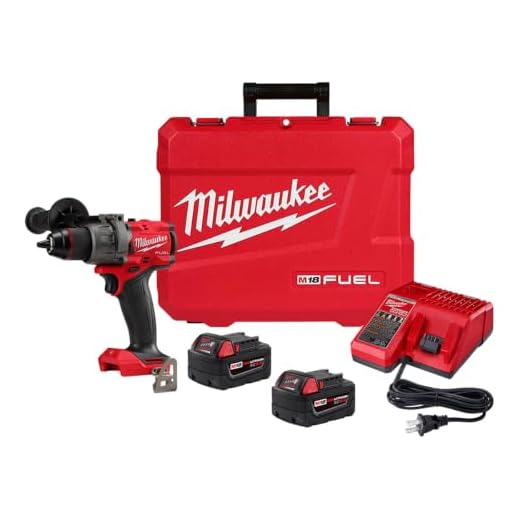

Unboxing and Inspection
Carefully unbox the Milwaukee M18 Fuel 1/2″ Hammer Drill Kit. Unpack all components from the box. Inspect each part to ensure everything is included and in good condition. Check for any damages or missing items before proceeding with the setup.
Charging the Battery
- Before using the Milwaukee M18 Fuel 1/2″ Hammer Drill Kit, charge the battery according to the manufacturer’s instructions for optimal performance.
- Connect the charger to a power source and insert the battery onto the charger until it clicks into place.
- Wait for the battery to fully charge, indicated by a steady green light on the charger, then remove the battery from the charger before use.
- Avoid overcharging the battery to prolong its lifespan and ensure efficient tool operation.
Attaching the Drill Bit
First, select the appropriate drill bit for your task. Ensure the drill bit matches the size and type needed for the material you are working on. Next, securely attach the drill bit to the chuck of the Milwaukee M18 Fuel 1/2″ Hammer Drill. Insert the drill bit into the chuck and tighten it by hand. Finally, engage the chuck’s locking mechanism by turning it until the drill bit is firmly in place. Test the connection by trying to wiggle the drill bit – it should be secure and not move.
For example:
- Select: If you are drilling into wood, choose a wood drill bit of the appropriate size.
- Securely attach: Insert the chosen drill bit into the chuck and hand-tighten it by turning the chuck clockwise.
- Engage: After inserting the drill bit, turn the chuck again until it clicks into place, indicating it’s locked securely.
Adjusting Settings
First, familiarize yourself with the drill’s settings by referring to the user manual. Adjust the speed setting to control the rotation rate of the drill bit. Next, set the torque level to match the resistance of the material you are working with. Ensure you select the appropriate drilling mode, such as drilling, screwdriving, or hammer drilling, based on your specific task. Remember to always wear appropriate safety gear and follow the manufacturer’s recommendations when adjusting these settings.
Using the Hammer Drill
- Hold the drill firmly with both hands.
- Position the bit on the material where you want to drill.
- Apply steady pressure while activating the drill to start drilling.
- Maintain control throughout the process.
Safety Precautions
Wearing safety goggles shields your eyes from debris or sparks that may fly off while drilling. Protective gloves can prevent cuts, scrapes, or burns when handling the drill or working with materials. Remember, safety gear is your first line of defense against accidents. Be sure to have them on every time you use your Milwaukee M18 Fuel 1/2″ Hammer Drill Kit.
Cooling Down
Allow the drill to cool down by turning it off and letting it rest for at least 5-10 minutes after extended use. This helps prevent overheating and ensures a longer life for your tool. You can place the drill on a cool, flat surface away from direct sunlight to help speed up the cooling process. Remember to always prioritize safety and care for your tools to maintain their efficiency.
Maintenance
Regularly clean and inspect your drill for any damage. Wipe down the exterior with a clean, dry cloth and check for any signs of wear or loose parts. Inspect the cord for any fraying or exposed wires. Following the manufacturer’s maintenance guidelines, such as lubricating moving parts and replacing worn-out brushes, will ensure your Milwaukee M18 Fuel 1/2″ Hammer Drill Kit stays in optimal condition.
Storage
- Store the drill in a dry area to prevent moisture damage.
- Find a secure location away from extreme temperatures to preserve the drill’s performance.
- Remember to keep it in a place where it won’t be easily knocked over or damaged.
Troubleshooting
Refer to the user manual or contact customer support if issues arise. The manual provides troubleshooting steps for common problems. Customer support can offer further assistance when needed. Utilize these resources to address any malfunctions effectively.
Wrap Up and Final Thoughts
Using the Milwaukee M18 Fuel 1/2″ Hammer Drill Kit has been a game-changer in my toolkit. Its powerful performance, combined with the long-lasting battery, makes tackling any project a breeze. Whether you’re a professional or a DIY enthusiast like me, this tool’s versatility and reliability stand out.
I’ve found it to be perfect for both heavy-duty tasks and more delicate jobs. If you’re looking for a hammer drill that truly delivers on its promises, I can’t recommend the Milwaukee M18 Fuel enough. It’s been a solid investment, and I’m sure it will be for you too. Happy drilling!
Essential equipment

Expert Drilling Techniques
Instructions for Operating the Milwaukee M18 Fuel 1/2″ Hammer Drill Kit
- First, make sure the battery is fully charged before you begin using the Milwaukee M18 Fuel 1/2″ Hammer Drill Kit
- Attach the appropriate drill bit securely to the chuck of the hammer drill
- Adjust the speed settings on the hammer drill to match the material you are drilling into
- Hold the drill firmly with both hands and apply steady pressure as you operate the tool
- Remember to wear safety goggles and ear protection when using the hammer drill for your safety
Common Questions about the Milwaukee M18 Fuel Hammer Drill Kit
Yes, the Milwaukee M18 Fuel 1/2″ Hammer Drill Kit can be used for woodworking projects. It is a powerful and versatile tool that can handle a variety of tasks, including drilling holes and driving screws in wood. The hammer drill function can be useful for more demanding woodworking applications where extra power is needed. Just make sure to use the appropriate drill bits and accessories for woodworking to get the best results.
The battery life of the Milwaukee M18 Fuel 1/2″ Hammer Drill can vary based on usage and conditions. On average, you can expect the battery to last anywhere from 1-2 hours with continuous use. Be sure to fully charge the battery before use for optimal performance.
Yes, the Milwaukee M18 Fuel 1/2″ Hammer Drill does come with several safety features to ensure safe operation. Some of the safety features include an electronic clutch to prevent kickback in case of a bit jam, overload protection to prevent overheating, and a side handle for better control and stability during operation. Additionally, the drill has a built-in LED light to increase visibility in dimly lit work areas, further enhancing safety during use. These safety features are designed to protect you and others while working with the Milwaukee M18 Fuel 1/2″ Hammer Drill.
The maximum torque of a drill is the measure of the twisting force it can generate. To find out the specific maximum torque of a drill, you would need to look it up in the drill’s technical specifications provided by the manufacturer. This information is usually listed in pound-feet (lb-ft) or Newton-meters (Nm) on the product packaging or the manufacturer’s website. Make sure to check the product details for the accurate maximum torque of your drill.




For those new to using a hammer drill, I suggest starting with a lower speed setting to get a feel for the tool’s power and control before moving on to higher speeds for tougher tasks.
That’s a great tip! Starting with a lower speed setting can help beginners build confidence and precision with the hammer drill.
Can you recommend specific drill bit sizes for different applications? It would be helpful for beginners to have some guidance on this.
Thank you for your question! We recommend using 1/4″ or 3/8″ drill bits for general drilling applications and 1/2″ drill bits for heavier duty tasks.
Thank you for your positive feedback! We strive to ensure that our products reach our customers in top condition.
I adapted the settings based on the material I was drilling into, and it made a significant difference in performance. Adjusting the torque settings is crucial for efficient drilling.
I found that charging the battery took longer than expected. It would be helpful to include an estimated charging time in the guide to manage expectations better.
Thank you for the suggestion! Providing an estimated charging time is a great idea to help users plan their usage of the drill more effectively.
What are the recommended safety gear when using the Milwaukee M18 Fuel 1/2″ Hammer Drill Kit? Eye protection and gloves are a must, but are there any other safety precautions to consider?
Thank you for raising this important question! In addition to eye protection and gloves, we also recommend wearing ear protection, a dust mask, and sturdy footwear for added safety.
I’ve been using the Milwaukee M18 Fuel 1/2″ Hammer Drill Kit for heavy-duty projects for over a year now, and regular maintenance has kept it in top condition. Following the maintenance tips in the guide has been instrumental in prolonging the tool’s lifespan.
Thank you for sharing your long-term experience with the drill! Regular maintenance is key to ensuring the tool’s performance and durability over time.
I’ve encountered an issue with the battery not holding a charge as long as it used to. Any tips for troubleshooting battery performance problems?
Thank you for reaching out! If you’re experiencing issues with battery performance, we recommend checking the battery contacts for dirt or debris, ensuring proper ventilation during charging, and considering a battery replacement if necessary.
Great guide! Unboxing and inspecting the Milwaukee M18 Fuel 1/2″ Hammer Drill Kit was straightforward. The packaging was secure, and all components were in perfect condition. Very impressed with the quality of the product.