


The step-by-step guide “How to prevent rust on an adjustable pipe wrench” provides essential tips for maintaining and preventing rust on this tool. By following the guide, users can ensure the longevity and efficient performance of their adjustable pipe wrench, ultimately saving time and money on replacements.


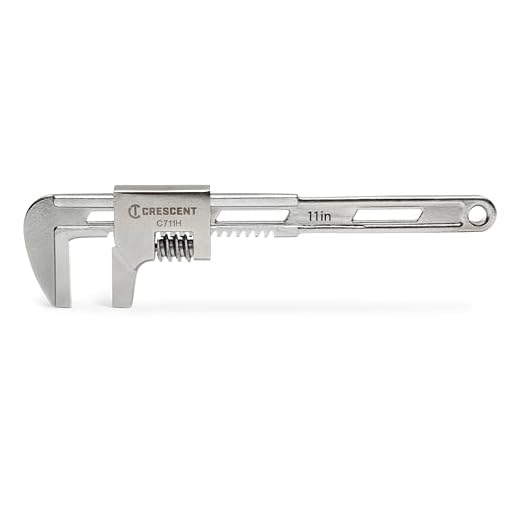
Inspect the Wrench Regularly
Check the wrench regularly for any signs of rust or corrosion. Inspect all movable parts of the wrench, including the handle, head, and adjusting mechanism. Rust and corrosion can weaken the structural integrity of the wrench, making it less effective and potentially unsafe to use. If you notice any rust or corrosion, clean the affected areas with a wire brush or fine-grit sandpaper. Afterwards, apply a light coat of oil to prevent further rusting. Regularly checking for rust and corrosion can help extend the lifespan of your wrench and ensure its optimal performance.
Clean the Wrench Thoroughly
- Use a wire brush or sandpaper: Start by grabbing a wire brush or sandpaper to scrub off any rust from the wrench. Ensure you get rid of all the rust spots to restore the wrench’s shine and effectiveness.
- Wipe down the wrench: Once you’ve removed the rust, take a clean cloth and wipe down the wrench thoroughly. Make sure to remove any leftover debris or dust to ensure the wrench is completely clean and ready for use again.
By following these steps, you’ll effectively clean your wrench and ensure it’s in optimal condition for your next project.
Apply a Rust Inhibitor
Start by cleaning the wrench to remove any dirt or grease. Next, spray or brush a quality rust inhibitor onto all metal surfaces of the wrench. Hold the spray can or dip the brush into the rust inhibitor solution and apply a generous and even coat on the metal parts. Ensure you cover all areas, including crevices and hard-to-reach spots, to provide full protection against rust. Let the inhibitor dry completely as per the manufacturer’s instructions before using the wrench again. Remember to reapply the rust inhibitor regularly for prolonged effectiveness.
Store the Wrench Properly
To keep the wrench in top condition, store it in a dry place away from moisture. Moisture can lead to rust and corrosion, shortening the lifespan of your tool. Consider utilizing a dehumidifier in the storage area to help maintain optimal conditions.
- Keep the wrench in a dry place: Store your wrench in a location that is free from humidity and moisture, such as a tool chest or a dedicated toolbox.
- Avoid damp environments: Do not store the wrench in areas like basements or outdoors where exposure to moisture is more likely.
- Use a dehumidifier: If you live in a particularly humid climate or your storage area tends to retain moisture, consider using a dehumidifier to keep the air dry and prevent rust on your wrench.
By following these simple steps, you can ensure that your wrench remains in excellent working condition for a longer period.
Use the Wrench Correctly
- Avoid using excessive force that could damage the wrench’s protective coating. Ensure a firm grip on the wrench handle. Apply steady pressure while turning, without exerting excessive force. Stop immediately if you encounter resistance beyond normal tightening levels. Using too much force can lead to scratches or chips in the wrench’s coating, reducing its durability and effectiveness. Pay attention to the feedback you’re receiving from the wrench – it should move smoothly without requiring extreme effort.
- Clean the wrench after each use. Wipe down the entire wrench with a clean, dry cloth to remove any dirt, grease, or debris. Use a mild degreaser sparingly if needed, following manufacturer’s recommendations. Inspect the wrench for any signs of damage or wear and tear while cleaning. Store the wrench in a dry environment to prevent rust or corrosion. Regularly maintaining and cleaning your wrench will prolong its lifespan and ensure optimal performance when you need it.
Maintain a Routine
Establish a regular maintenance schedule for your wrench to prevent rust buildup. After each use, wipe down your wrench with a clean, dry cloth to remove any moisture. Store your wrench in a dry environment away from excessive humidity. Once a month, inspect your wrench for any signs of rust. If you notice any rust spots, gently scrub them with a wire brush or steel wool.
Reapply a rust inhibitor to your wrench as needed to provide an extra layer of protection. Choose a high-quality rust inhibitor product and follow the manufacturer’s instructions for application. By incorporating these simple maintenance tasks into your routine, you can ensure that your wrench stays in top condition and functions optimally for years to come.
Replace Damaged Parts
Inspect your wrench regularly for any signs of significant rust or damage. If you notice any such issues, it is crucial to replace the affected parts promptly to ensure the continued functionality of your tool. Begin by identifying the specific parts that are rusty or damaged. Next, acquire the necessary replacement parts from a hardware or tool store, ensuring they are compatible with your wrench model. Once you have the new parts, use the appropriate tools to safely remove the old, damaged components and install the replacements securely. Be sure to test the wrench afterwards to confirm that the new parts have been successfully installed and that the tool functions properly. Regular maintenance and timely replacement of damaged parts will help extend the longevity of your wrench and ensure its effectiveness in various tasks.
Effective Rust Prevention Tips
Conclusion:
By following these steps to prevent rust on your adjustable pipe wrench, you can ensure its durability and reliability for your future projects. Remember, a little maintenance can go a long way in preserving your tools and saving you time and money in the long run. Keep your adjustable pipe wrench clean, dry, and well-oiled to extend its lifespan and performance. Your projects will thank you for it!
Rust Prevention Materials

Maintenance Suggestions
Step-by-Step Guide to Using Your Adjustable Pipe Wrench
- Before use, ensure the wrench is set to the correct jaw opening size for the pipe you are working on
- Grip the pipe firmly with the wrench’s jaws, making sure they are positioned securely around the pipe
- Adjust the wrench as needed by twisting the knurled knob to increase or decrease the jaw opening size
- Use consistent pressure and leverage to turn the pipe either clockwise or counterclockwise, depending on the task at hand
- After use, clean the wrench with a rag and store it in a cool, dry place to prevent rusting and damage
Answers to Common Questions
To maintain and care for an adjustable pipe wrench, you should regularly clean it after each use with a rag to remove any dirt or debris. Keep the moving parts lubricated with oil to prevent rust and ensure smooth operation. Store the wrench in a dry place to prevent corrosion. Avoid using the wrench on oversized or stuck pipes as this can damage the tool. Inspect the wrench for any signs of wear or damage, and replace any worn parts as needed for safe and effective use.
An adjustable pipe wrench works by using its adjustable jaw to securely grip onto different sizes of pipes or fittings. By turning the knurled knob at the end of the wrench handle, you can adjust the size of the jaw opening to fit the specific pipe or object you are working with. Once the jaw is properly adjusted, you can use the wrench to tighten, loosen, or hold the pipe in place. The design of the adjustable pipe wrench allows it to provide a strong, non-slip grip, making it a versatile tool for plumbing and other applications.
Yes, an adjustable pipe wrench can be used on both metal and plastic pipes. However, it is important to note that using a pipe wrench on plastic pipes requires caution as plastic is more prone to damage compared to metal pipes. It is recommended to use padded jaws or a cloth between the wrench and the plastic pipe to prevent crushing or cracking. Additionally, be careful not to over-tighten the wrench when working with plastic pipes to avoid causing any damage.
When using an adjustable pipe wrench, proper technique is key to ensure safety and effectiveness. Here are the steps you should follow:
- Adjust the wrench jaws to fit the size of the pipe by turning the knurled adjustment wheel located on the handle.
- Position the wrench on the pipe so that the jaws grip the pipe firmly.
- Ensure the wrench is at a 90-degree angle to the pipe to maximize leverage.
- Push the handle in the direction of the turn you want to make.
- Use your body weight to apply pressure to the handle for added leverage.
- Avoid using the wrench on hardened steel pipes as it may damage the teeth.
- Always wear safety goggles and gloves when using a pipe wrench.By following these steps, you can effectively use an adjustable pipe wrench for your plumbing or mechanical tasks while preventing damage and ensuring your safety.
Adjustable pipe wrenches are versatile tools commonly used by plumbers and other tradespeople to grip, tighten, and loosen pipes and fittings with different sizes and shapes. Their adjustable jaws allow them to fit a variety of pipe diameters, making them essential for tasks that involve threaded pipes or fittings that need to be secured firmly. These wrenches can also be used on various types of piping materials, such as metal or PVC. Their durability and strong grip make them indispensable in plumbing, construction, and maintenance work.
The main components of an adjustable pipe wrench include a jaws assembly (with teeth for gripping), a handle for leverage, and a worm gear mechanism. The jaws can be adjusted to accommodate different pipe sizes by turning a knob or adjusting a wheel. The teeth on the jaws are designed to grip the pipe securely without slipping. The handle is used to apply the necessary torque to tighten or loosen pipes. The worm gear mechanism translates the turning motion of the adjustment knob into the opening or closing of the jaws.






Great tips for preventing rust on pipe wrenches.
I’ll definitely be implementing these suggestions.
Does anyone have recommendations for specific types of oil to use?
I found this article very informative!
Applying a rust inhibitor sounds like a smart proactive step.
Rust is such a nuisance; happy to have found these preventative measures.
I wonder if storing the wrench in a dry environment would further help prevent rust?
Proper maintenance is key to keeping our tools in good condition.
I struggle with rust on my tools; this article is a game-changer.
Have any readers tried using a protective coating on their tools?
I never thought about using oil to prevent rust; great idea.
Thanks for sharing such practical advice on rust prevention.
Would love to see more articles on tool maintenance and care.
These tips are easy and cost-effective to follow.
I’ll be checking my pipe wrench regularly from now on.